An Unexpected [Linux] Journey
![An Unexpected [Linux] Journey](/website/posts/linux-desktop/tux.jpg "Cover Image")
Introduction#
“The year of the Linux desktop” is somewhat of a running joke in the Linux community. It refers to the idea that one day, Linux will finally establish itself as a mainstream desktop operating system alongside Windows and macOS for everyday computer users. But the prophecy has not yet been fulfilled—thanks to limited support for popular software, a fragmented landscape of desktop environments, and minimal adoption from computer manufacturers. All of this has kept Linux just out of reach for the average computer user.
But Linux has been in the news several times in the past few years, and it feels like the tide might actually be turning. Valve proved—through the massive success of the Steam Deck—that Linux doesn’t have to be intimidating; they put a full-fledged Linux desktop in the hands of millions of gamers, many of whom probably didn’t even realize it. More recently, DHH has helped generate enthusiasm for Linux through the release of Omarchy, a beautiful, easy-to-install Arch Linux configuration geared towards developers. Just last week, the team behind Zorin OS disclosed that its Windows-like Linux distribution has gained almost a million new users in the last month thanks to Windows 10 reaching end of life. With Linux adoption rising at such a rapid clip, could 2026 be the year of the Linux desktop?
First Contact with Desktop Linux#
I was in high school the first time I installed Linux on a computer. I had just built my second desktop, and I needed an operating system for it. While I don’t remember why 16 year old me felt the need to own two desktops, I do recall that my primary motivation for installing Linux on that machine was simply because I did not want to buy a second Windows 10 license. I had worked hard all summer to save up for that machine, and the last thing I wanted to do was fork over another $100 to Microsoft just to make it run. I installed Ubuntu 16.04 LTS because that was the only Linux distribution I knew. As I booted into the GNOME desktop environment for the first time, I was both in awe and disbelief. Compared to my Windows machine, this OS booted faster, was more customizable, and completely free to use?! My mind was blown. There had to be a catch. Why isn’t everybody using Linux?
After playing with my new toy for a while, I quickly figured out the answer to that question: software compatibility, or more accurately, the lack thereof. I was a bit disappointed to discover that it could not run the Microsoft Office suite (which I needed for school work) or play most of my Steam games. Despite these challenges, I couldn’t get over the fact that this operating system was completely free. I was perfectly content to use it for tinkering, web browsing, and coding video games with Python.
I soon discovered that there were other Linux flavors outside Ubuntu and developed a habit of distro hopping. Distro hopping is Linux slang for constantly installing different Linux distributions on your computer. It is common for Linux newcomers to become distro hoppers, simply because there are a ton of unique options to choose from! By changing your Linux distribution, you can completely change the appearance and functionality of your system. With so many different ways to experience Linux, it’s hard to resist trying them all to see which one you like best.
Distribution vs. Desktop Environment#
GNOME, KDE, XFCE, and Cinnamon Desktop Environments
Before the next section, it is important to understand the difference between a Linux distribution and a Linux desktop environment. Let’s start with the distribution (or distro). My definition of a Linux distribution is a software suite that includes three key components:
- The Linux kernel
- A package manager (ie, a piece of software that manages additional software packages)
- Some preinstalled packages
Most mainstream Linux distros are supported by some sort of governing body. Broadly speaking, this governing body is responsible for maintaining a repository of packages (software) for the distro and operating the servers required to distribute that software to the end users. Some distros are backed by corporate entities such as Fedora, which is supported by Red Hat. Other distros like Debian adopt a more community-centered philosophy, where thousands of individual contributors bear the collective burden of maintenance and development.
A Linux desktop environment is simply a subset of those preinstalled packages in a distro that provide all the graphical functions for the system. The desktop environment provides the necessary software for managing windows, facilitating user interactions, and running applications. Desktop environments often come pre-loaded with commonly used software, such as a file manager, calendar, calculator, office suite, etc. Most of the visually observable differences between distributions are really in the desktop environment, not the underlying distro (though there are certainly differences between distributions). This realization unlocks a whole new approach to customizing Linux, since most desktop environments can be installed on most distributions.
Down The Rabbit Hole#
After distro-hopping for a few years and installing more desktop environments than I could count, I discovered the world of Linux ricing. In a nutshell, Linux “ricing” (no idea where that term came from) is the practice of heavily customizing the look and feel of your Linux desktop environment to make it uniquely stylish or visually impressive. To use an analogy that predates my existence, it’s sort of like customizing your MySpace profile page, except instead of a social media site, you’re customizing an entire desktop experience. Ricing goes way beyond just changing your icon theme and setting a cool background-it’s deep in big nerd territory, requiring extensive knowledge of Linux systems and a willingness to tinker and troubleshoot for hours on end.
For my first “rice”, I used Debian 12 as the base distribution and installed Sway for my desktop environment. Sway is in a unique class of desktop environments known as “tiling window managers”. Unlike Windows, macOS, or even most mainstream Linux distros, where application windows “float” around the screen, tiling window managers automatically “tile” or arrange application windows for you. Another unique aspect of tiling window managers is that system navigation (switching between apps and workspaces) is typically driven entirely by keyboard shortcuts. The advantage of using a tiling window manager is that, with a little bit of practice, you can navigate between applications much faster than on a floating window system.
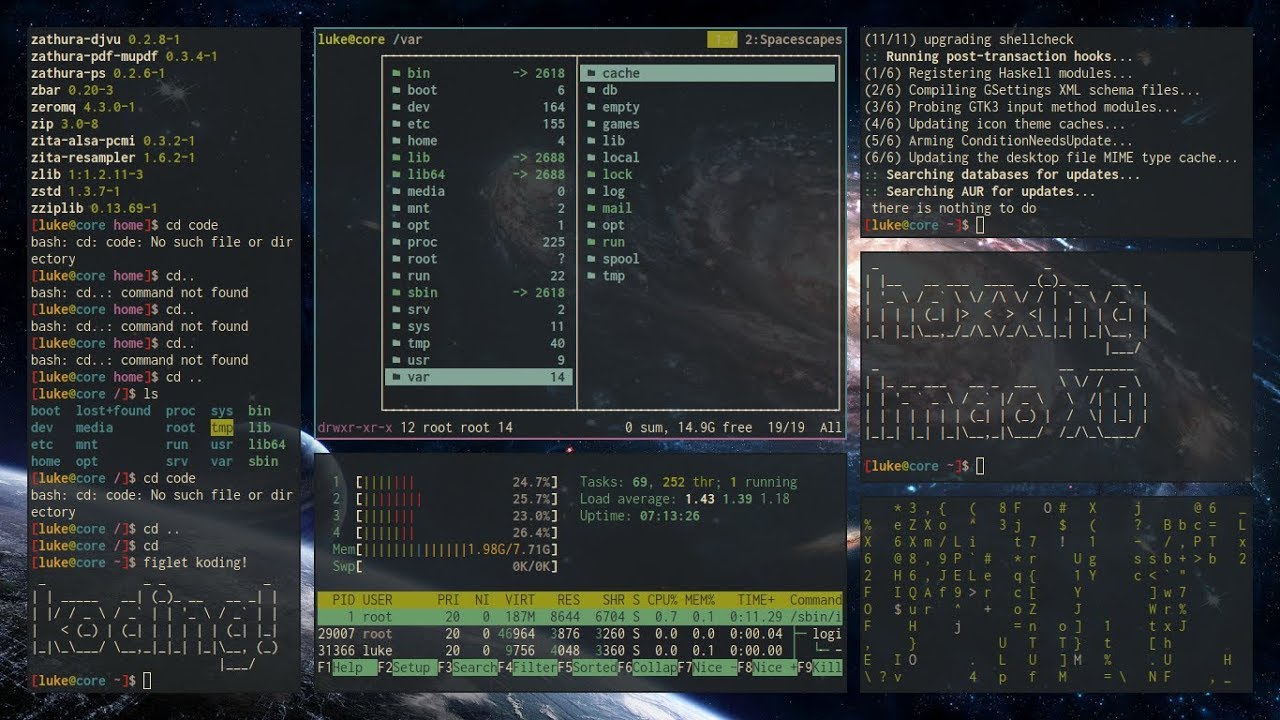
Tiling Window Manager Example
Tiling window managers like Sway are extremely minimal by design. You won’t find any preinstalled applications, graphical utilities, or built-in conveniences that you’d normally expect from a traditional desktop environment. They are geared towards power users who want to hand-select every piece of software that gets installed on their machine. Everything, and I mean everything, that makes up the system needs to be installed and configured manually. Even fundamental components—like an application launcher, notification daemon, network manager, screenshot tool, and sometimes even basic fonts—must be installed and configured by hand before the system feels usable. I spent hours upon hours picking packages and crafting config files until my system was aesthetically pleasing, performant, and tailored exactly to my needs.
Setting up Sway was a fantastic learning experience, but it was also a pain in the neck sometimes. There were several occasions where I would take my laptop to a coffee shop to get some work done, only to spend the first 30 minutes troubleshooting why my WiFi wasn’t working, or worse, why my system wouldn’t boot. And it wasn’t just a few times; these little hiccups kept happening over and over again. After a while, I got fed up with Sway, and decided that it was simply too much effort to maintain. It also seemed wrong to force myself to use a system that, despite its beauty, was so fragile and frustrating. (Looking back now, almost all of the problems I faced could be attributed to my lack of experience. As a beginner, you don’t know what you don’t know, which makes troubleshooting these issues extremely difficult.) Feeling defeated, I wiped my system and installed bone stock Fedora with the GNOME desktop environment. For the better part of two years, Fedora and GNOME provided me with a stable desktop experience for my everyday computer tasks.
A New Hope#
![]()
Omarchy Logo
And then, this past summer, DHH released Omarchy. Unlike established Linux distros like Ubuntu and Fedora, Omarchy isn’t a “distro” in the traditional sense. Instead, it’s essentially an Arch Linux install bundled with DHH’s favorite applications and configuration files-and an absolute boat-load of bash scripts. A longtime macOS user, DHH only made the switch to Linux earlier this year, but his enthusiasm for the OS has been infectious. Through interviews, podcasts, and blog posts, he has been documenting his Linux experience and delight in building Omarchy, even going so far as to make it the default system configuration for all employees at his company, 37Signals.
Omarchy is built on Hyprland, a tiling window manager similar to Sway with some additional avenues for customization. What immediately struck me about Omarchy is how robust and cohesive it feels for a tiling window manager setup. It was far from the hack-job Sway configuration I had put together a few years back. The theming system alone is remarkably thorough: cycling through the theme options automatically updates everything from the wallpaper to Neovim to even a micro-forked version of Chromium. Omarchy’s update utility is just as polished. It’s essentially a bash script that not only updates your system packages, but also pulls and installs the latest configuration files from the Omarchy GitHub repository. There’s even a mechanism for running migration scripts to help users set up new features, if any were included in the updates. DHH and the Omarchy contributors had seemingly created a tiling window manager desktop environment that was actually usable by everyday people.
Omarchy Desktop
At launch, Omarchy’s installation process was a bit unusual. You would first install Arch Linux manually using the archinstall utility, then boot into the system, download the Omarchy install script, and run it. The script handled everything—fetching Omarchy’s assets, installing its applications, and configuring the system. After it finished, a simple reboot brought you into a fully set-up desktop environment. This workflow has since been replaced with an ISO, but I appreciated the scripted approach because the bash files were easy to reason about and made it clear exactly what was being installed and how everything was configured.
Omarchy demonstrates that a highly customized tiling window manager Linux setup doesn’t have to be delicate. With enough care, it is possible to build a desktop that’s both beautiful and reliable. Although Omarchy wasn’t the right daily driver for me, it had reignited my interest in Linux ricing and inspired me to give tiling window managers another go. I loved the clarity and reproducibility that came from Omarchy’s bash-script centric approach, and I wanted to apply that same system to my new rice.
Return of the Rice#
For my new rice, I wanted to start totally from scratch. The first step was to select a base Linux distribution. I considered several options, including Fedora, Ubuntu, and Debian, but I landed on Arch Linux for two key reasons:
- The Arch Wiki - The Arch Wiki is an invaluable resource for learning about Linux. If it runs on Arch, there’s a good chance the Wiki has a page for it. I used the Wiki heavily while setting up my system, and I continue to use it for troubleshooting and learning.
- The Arch Linux User Repository (AUR) - Generally speaking, installing software on your computer from random people on the internet is ill-advised. However, there are a handful of packages I wanted to install that are only available through the AUR. I use the AUR sparingly, but it is nice to have it in the toolbox.
Hyprland#

Next, I needed to choose a tiling window manager. While I could have gone back to Sway, I decided on Hyprland, primarily due to its excellent documentation. The Hyprland Wiki is a fantastic guide, not just for configuring Hyprland, but for assembling a complete desktop environment. The “Useful Utilities” pages are a great example. These pages cover all the additional bits that most users will probably want to configure in addition to Hyprland, such as a notification daemon, a status bar, or a desktop wallpaper. This was the sort of guide I wish I had years ago when I was first starting out with Sway. For the tiling window manager veterans, this all seems obvious, but for relative newcomers like myself, these notes are incredibly useful.
Packages and Applications#
The next thing I did was to create text files listing all the packages I wanted to install on my system. Above each package (or group of packages), I added comments to remind myself what that package is for. With these comments, I won’t accidentally remove something important and break my install. It’s also a great way to keep track of everything I’ve installed on my system. I have separate files for Arch repository packages, AUR packages, and Flatpaks. With a bash script (stolen directly from the Omarchy repository), I can install all the packages in a single command. Here’s a sample:
# Printing
cups
cups-browsed
cups-filters
cups-pdf

...

# Login manager
greetd
greetd-regreet

# Dependency for Flameshot
grim

# Static site generator
hugo

...

# GUI for managing displays
nwg-displays
Templating Script#
I also wrote a small templating script in Python that reads values from a .env file and inserts them into configuration files using Jinja syntax. This lets me share fonts, colors, and other system-wide settings across multiple apps.
In the example below, I have two configuration files: one for Fuzzel, my app launcher, and one for Waybar, my status bar. I wanted to use the same font for both Waybar and Fuzzel, so instead of hardcoding CaskaydiaCove Nerd Font in both files, I use the Jinja syntax to programmatically insert the font name into both files.
# .env
FONT='CaskaydiaCove Nerd Font'
# fuzzel.jijna.ini
font={{ FONT }}:size=16
/* (Waybar) style.jinja.css */
* {
font-family: "{{ FONT }}", Roboto, Helvetica;
font-size: 14px;
font-weight: 600;
min-height: 0;
}
After executing the template script, the files look like this:
# fuzzel.jijna.ini
font=CaskaydiaCove Nerd Font:size=16
/* (Waybar) style.jinja.css */
* {
font-family: "CaskaydiaCove Nerd Font", Roboto, Helvetica;
font-size: 14px;
font-weight: 600;
min-height: 0;
}
Web Apps#
Another idea I took directly from the Omarchy playbook is web apps. Web apps are desktop shortcuts to your most frequently used sites, such as GitHub, YouTube, and ChatGPT. Launching one of these apps via Fuzzel opens Chromium to the web page for that application. This is a useful workaround for applications that don’t have a native Linux client. I added web apps for YouTube, Proton Mail, Proton Calendar, and the National Weather Service.

Setup Scripts#
With my packages and applications sorted, I wrote (or stole) a few bash scripts to set everything up on a fresh Arch install, just like Omarchy did. I broke the process into five separate scripts, mostly to make debugging and testing easier. I ended up with the following workflow:
# Installs yay, an AUR helper
./setup.sh
# Installs packages listed in the aforementioned text files
./install.sh
# Move config files to the correct locations
./configs.sh
# Miscellaneous tasks (enable systemd services, add user to docker group, etc.)
./post-setup.sh
Reboot the machine, then run:
# Install flatpaks + flatpak configurations
./post-reboot.sh
The Final Result#
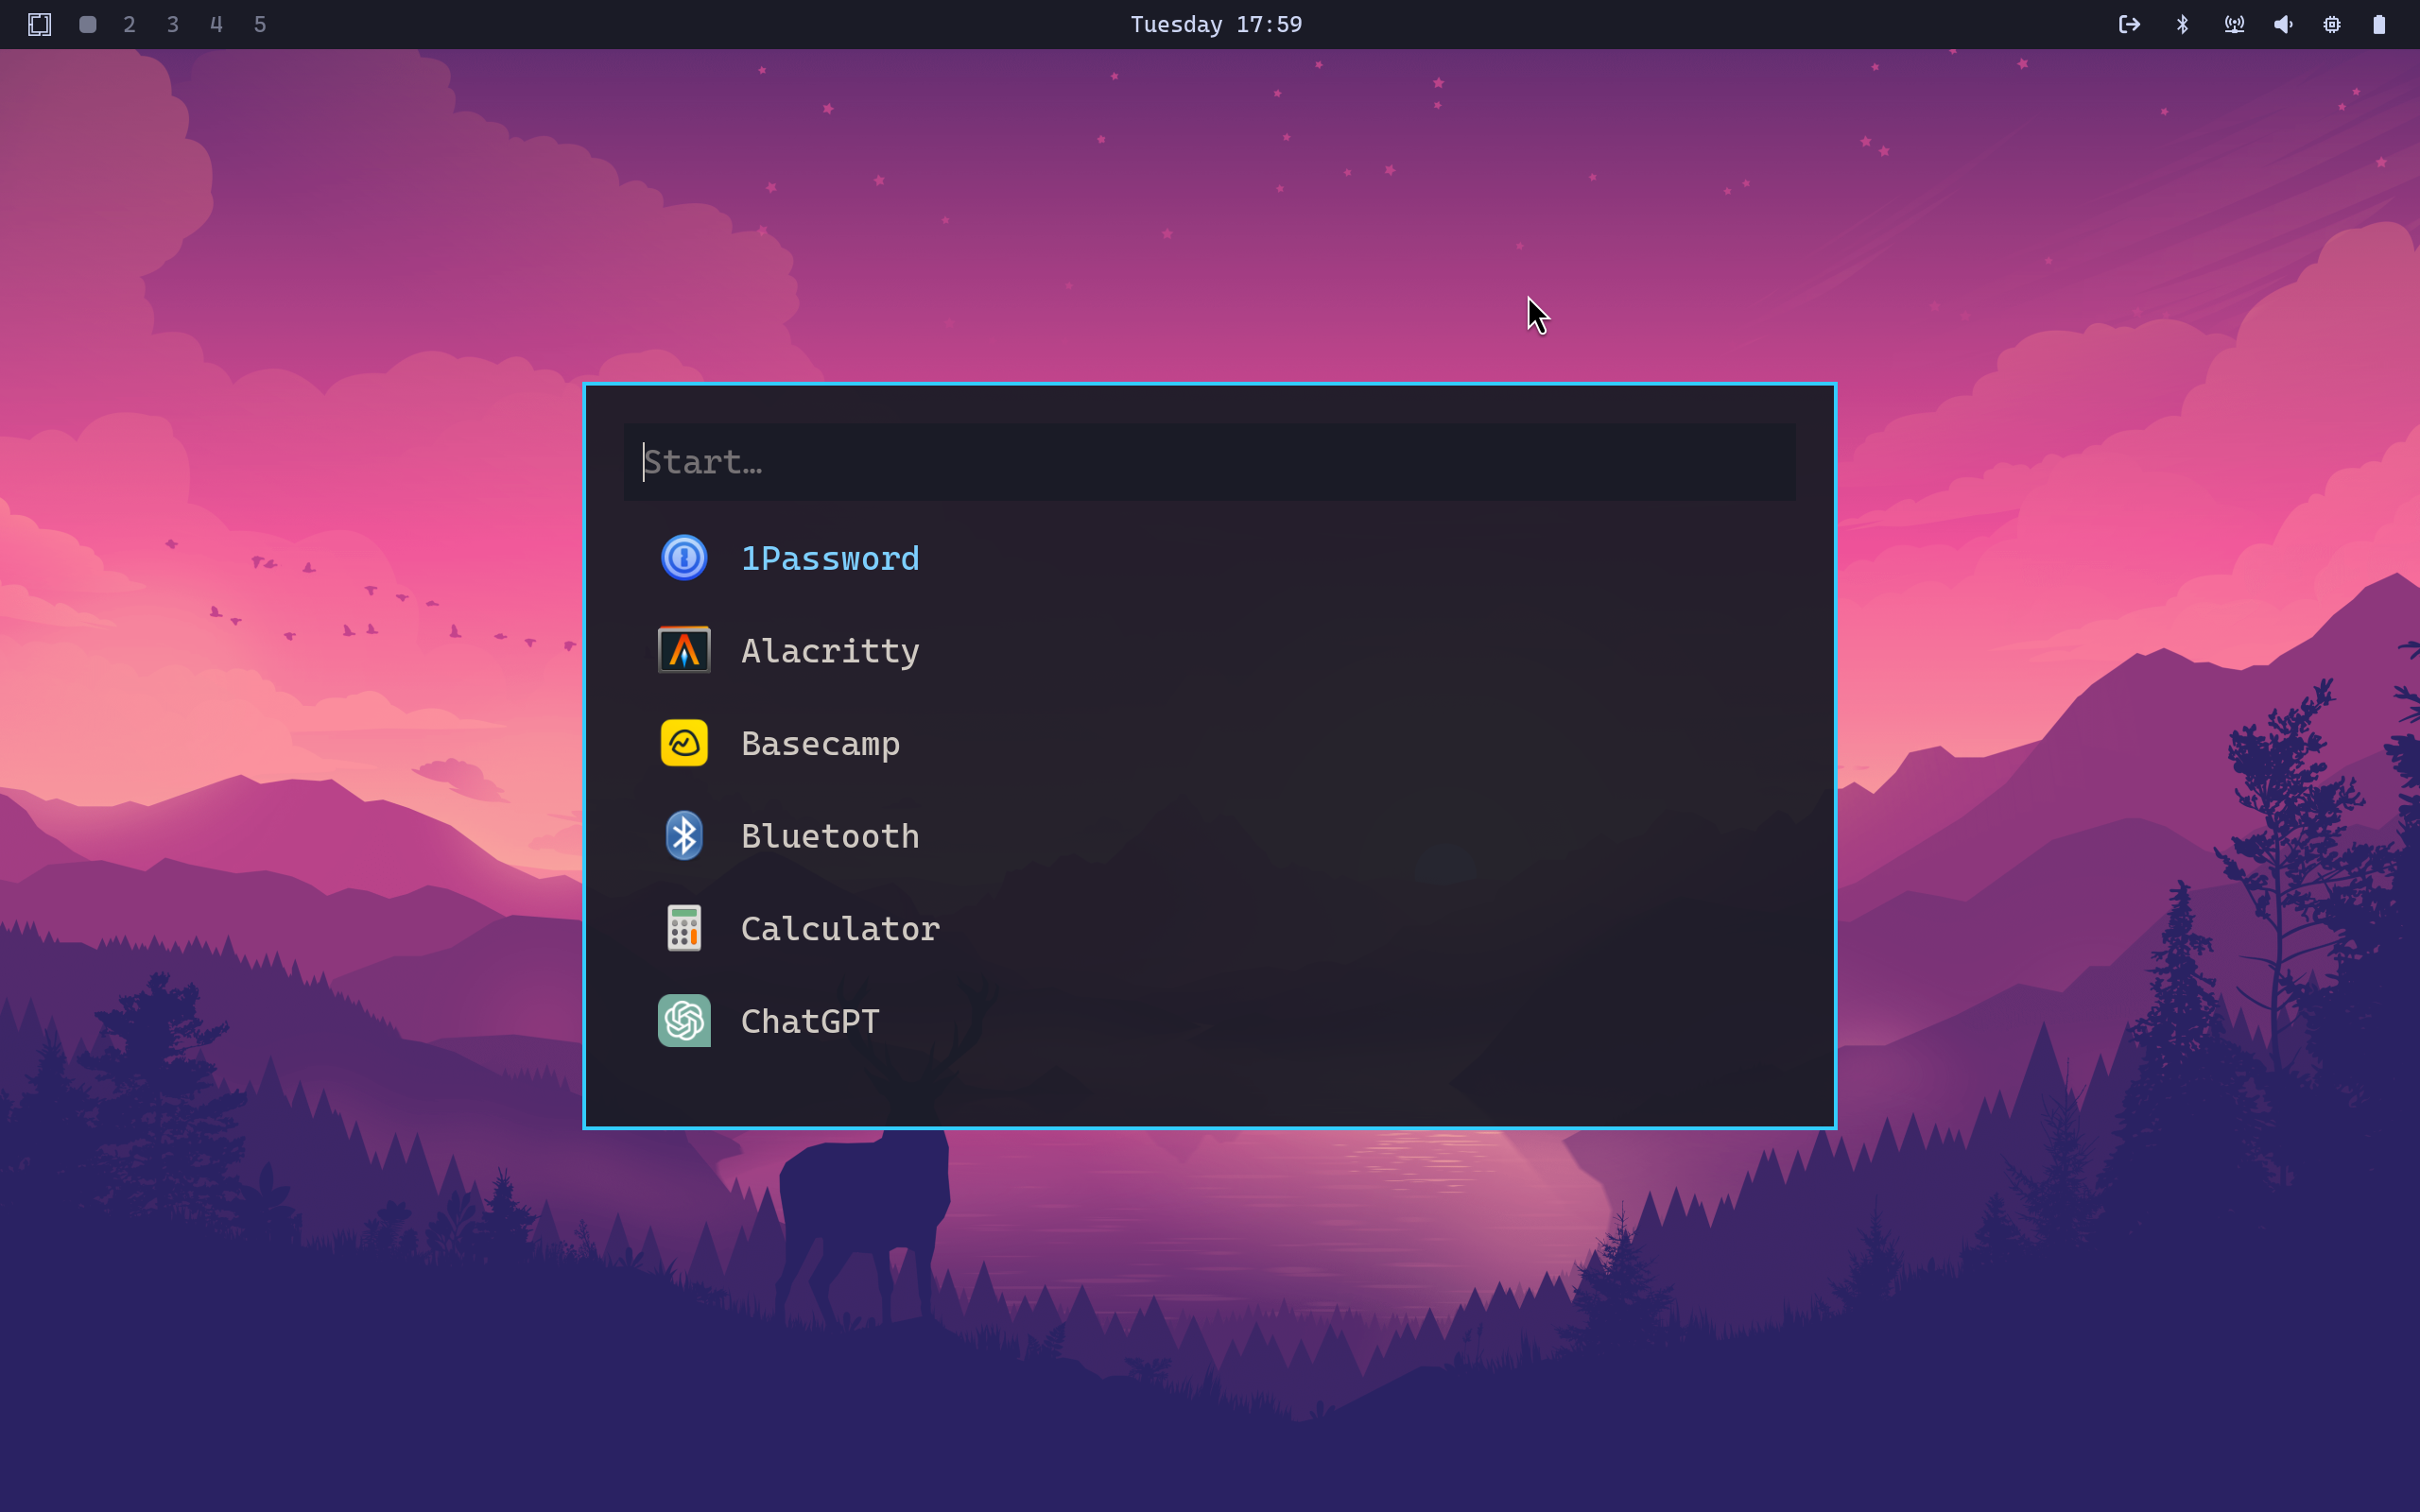
After spending countless hours on this project, I am super happy with the results! To keep things simple and easy to maintain, I didn’t stray too far from the defaults for most applications, and I opted for a monochrome color palette across the board. I went with blue as my one “accent color”, using it in multiple applications such as the Hyprland active window border, Fuzzel window border, and Mako (notification) window border. Thanks to my templating script, this can be easily changed in the future if I so desire.
I am particularly excited about the quick access settings I added to my Waybar config (shown in the gif above). Clicking the Bluetooth icon opens Blueberry, a GUI developed by the Linux Mint team for managing connected Bluetooth devices. Clicking the audio indicator opens Pipewire Volume Control, a GUI for managing audio settings. Pipewire Volume Control is handy when you need to quickly change the audio output if you have several audio devices connected. Clicking the networking indicator opens nmtui, a TUI that comes pre-installed with Network Manager for connecting to WiFi. Finally, clicking the power icon opens a custom power menu, with options to logout, suspend, reboot, and shutdown the system. In aggregate, these little additions drastically improve the system’s usability.
I’ve been running this configuration on my personal computers for about three weeks now, and it has been an absolute joy to use. Since Linux is so lightweight, older machines like my Lenovo Thinkpad T430, which I recently picked up off eBay, have no problems running this setup. In fact, this entire article was written entirely on the T430, and I’ll be writing another article specifically about this machine soon!
I also want to give a massive shout-out to Omarchy for providing a solid reference on how to set things up in Hyprland. This project would not have been possible without that repository to guide me along the way.
Closing Thoughts#
There’s a saying in the Linux community that “Linux is only free if you don’t value your time.” While I do think that saying is becoming less true as time goes on, it was absolutely true for this project. I spent hours upon hours learning, researching, watching YouTube videos, reading forums, writing scripts, configuring files, and fixing bugs, just to reach a state that is, admittedly, probably still less stable than Windows or macOS. Not to mention, I will need to perform ongoing maintenance on the configuration as packages get updated. (Literally a few days after setting up my T430, Hyprland pushed a breaking change that required an update to a config file.) As someone who makes my living with a keyboard and mouse, I don’t mind that extra bit of friction. Dare I say, I actually enjoy it. But I think it goes without saying that this project is certainly not for everyone, especially if you don’t enjoy troubleshooting computers.
Will 2026 finally be the year of the Linux desktop? Realistically, probably not. However, I do find it fascinating that while Linux is gaining momentum, Windows is simultaneously getting worse by the day as Microsoft pushes out one anti-consumer update after another. Just this year, Microsoft has patched multiple loopholes, which allowed Windows 11 to be installed without a Microsoft account under the guise of “security improvements”, requiring users to hand over their personal information to Microsoft just to use the machine that they already paid for. And let’s not forget how Microsoft pushed millions of otherwise perfectly functional computers into obsolescence with completely unreasonable and seemingly arbitrary Windows 11 minimum system requirements. But perhaps Microsoft’s worst offense of all is their insistence on injecting AI into every aspect of their OS. The disastrous launch of Recall made it abundantly clear that people do not, in fact, want AI spyware running on their computer at all times. The dumpster fire that is modern Windows has inadvertently become an excellent advertisement for desktop Linux.
If you’re a Windows user (or a macOS user for that matter) who is tired of your computer spying on you without your consent, or you don’t care for the AI garbage getting slapped onto every new piece of software, you might want to give Linux a shot! If you have an old laptop lying around, throw a Linux distro like Ubuntu or Fedora on it and take it for a test drive. Maybe even install some open-source applications like LibreOffice or GIMP. The worst that can happen is you lose a few hours learning something new. Who knows, you might end up down the rabbit hole, too.
